Active Directory LDAP/LDS Extraction Tool
DISCLAIMER: This Import tool is only intended for Technical Audiences who have sound knowledge or familiarity with the Active Directory in their organization. This application needs to be run on a computer that is a member of the Active directory and the application must be started by a user that is currently logged into the same current active directory domain. Both the computer and the user account need to be a member of the active directory domain otherwise this application will not work.
LDAP stands for Lightweight Directory Access Protocol. It is a standardized protocol used to access and manage directory information services. A directory service is a
centralized database for storing and organizing information about users, resources, and objects in a network. LDAP provides a lightweight and efficient means of
querying and modifying this directory information.
This topic explains the steps to Import Customers and Employee using the Wasp Directory LDAP/LDS Extraction tool.
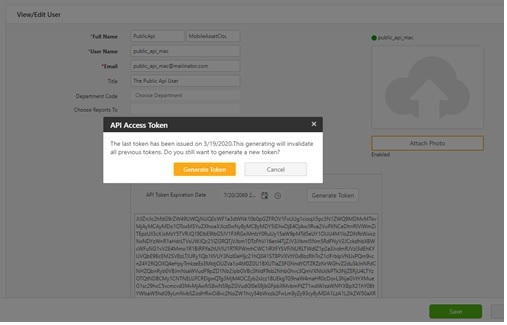
- Generating Public API token: Select User > Users. The View Users screen will appear. Click on the First Name of the user. The First Name is a Link in the View Users screen and it will navigate to the View/ Edit User screen. Click on the Generate Token button. The token will get downloaded. Either copy the token from the screen or copy it from the downloaded file.
Note: The token can only be generated by the user with an Administrative role.
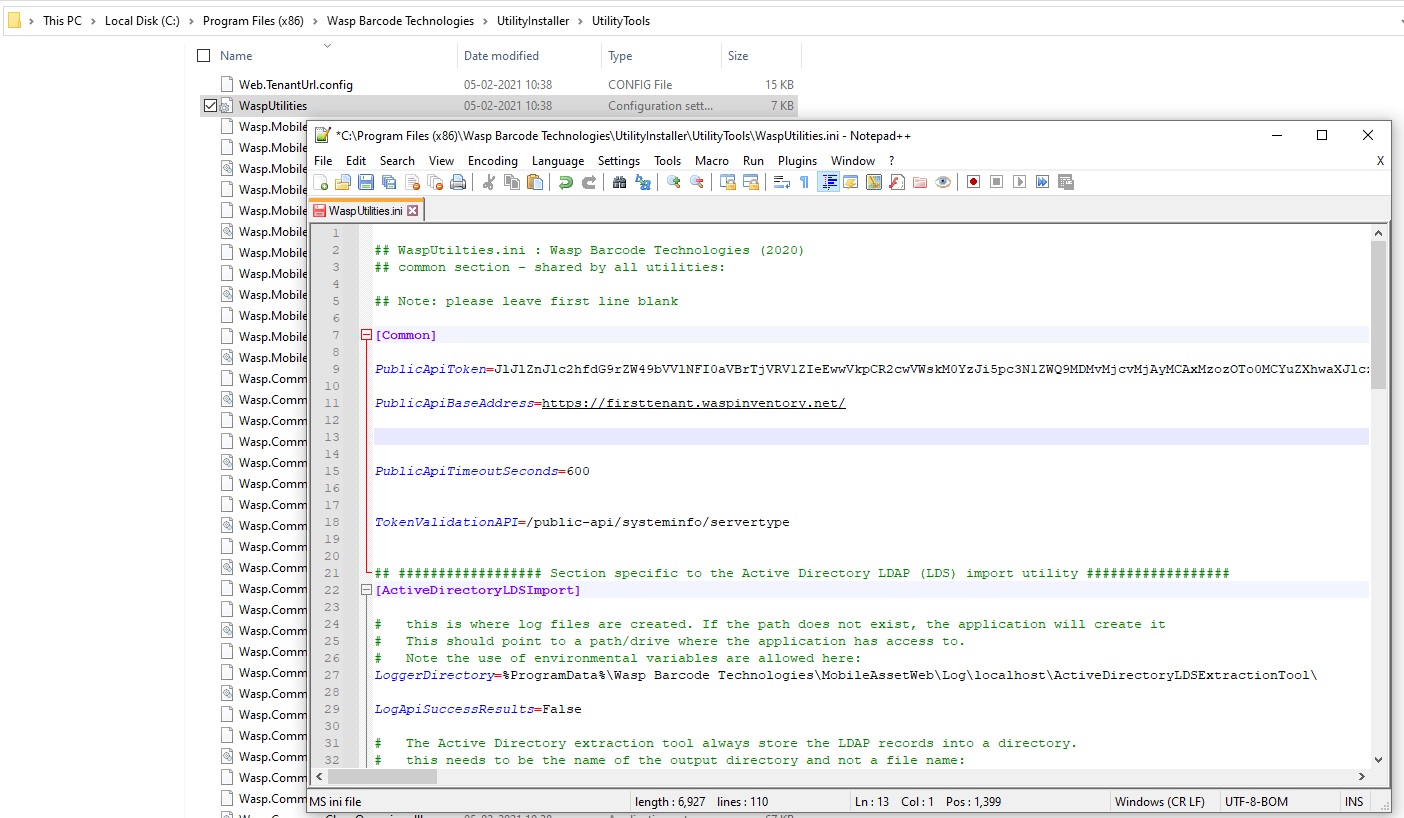
- Open the Wasp Utility Config file. Paste the token into the configuration file “WaspUtilities.ini” for the key “PublicApiToken”. The syntax should be PublicApiToken=value generated. Make the following changes:
- PublicApiToken - Replace and paste the new token.
Note: When editing the .ini file to add the Token and make any other changes, we highly recommend Notepad++ or similar. Under most current versions of Windows 'normal' users will not have sufficient access rights to modify the .ini file directly. Notepad++ is a very safe and reliable way to edit this file.
- PublicApiBaseAddress - Paste the URL of the InventoryCloud application, from where the token is generated.
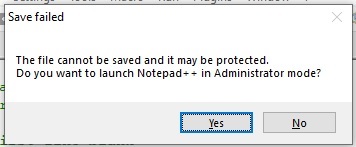
- A message will appear indicating the user to switch to Administrator mode. Click on the Yes button.
- The key “PublicApiBaseAddress” should also be set to the base address. The default value is https://localhost:44313 but this should be set to the base URL of your tenant like https://yourtenant.waspassetcloud.com or https://yourtenant.waspinventorycloud.com
For On-Premise installations, you need to use the URL to the MVC site, typically: http://hostname:#### or https://hostname:#### - Select the Wasp Extraction Tool and Run the application. When running the application WITHOUT command line parameters, the user is presented with an interactive application that can interactively test and diagnose the configuration. Command line parameters to ActiveDirectoryLDSExtractionTool.exe will be used after configuration to help automate the process, completing the integration.
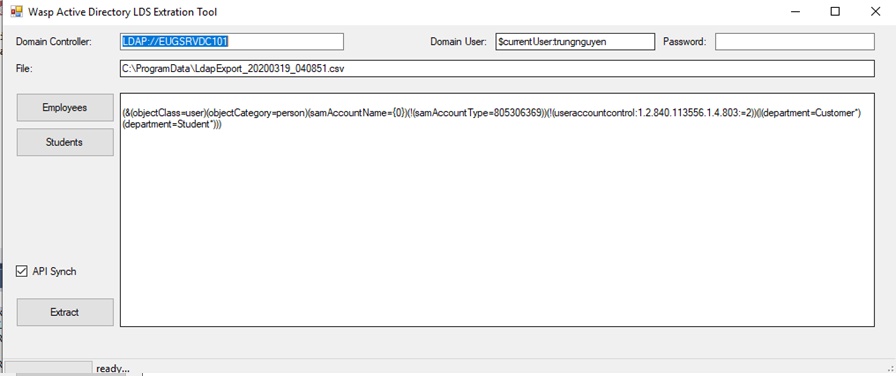
- By default, the LDAP starting path, the LDAP current user, and the password can be left blank.
- For advanced users, this can be changed. The default password is left blank since the application will use the current network login’s user credentials.
- The CSV output file is treated as a read-only field where the Excel (CSV) file will be produced.
- The button [employees] will load the LDAP QUERY stored in the application config file and set the “Extract” button to begin extracting Active Directory patterns for employees/staff using the LDAP query (or queries) being displayed.
- The button [Students] will do the same but will load the LDAP queries defined by the string in the configuration file.
- By default, the check box [Api synch] is turned on. When turned on, pressing the button [Extract] will produce a CSV file, and also perform a Public API call to synchronize the LDAP records to the [employee/staff] or [customer/student] tables in the API back end. If this check box is cleared, then no API will be invoked and only the CSV file will be produced.
Application Configuration (Configuration /AppSettings)
- LoggerDirectory: It is the directory where log files should be produced. Note we allow environment variables in the form of %ProgramData% (by default, this is c:\programData.
- PublicApiToken: Refer Generating Public API Token section on how to generate a public API token.
- PublicApiBaseAddress: This should be set to the base URL of your tenant like https://yourtenant.waspassetcloud.com or https://yourtenant.waspinventorycloud.com.
- For On-Premise installations, you need to use the URL to the MVC site, typically: http://hostname:#### or https://hostname:#### where the public API server is hosted.
- PublicApiTimeoutSeconds: It is the number of seconds to timeout. The default value is 10 minutes (600 seconds).
- PublicApiRecordsPerBatch: The # of LDAP records to batch per API call. The default is 400. Note that large values (approx. 1000) could cause buffering and serialization delays, as well as excessive memory or bandwidth. Using small values (like 5-10) would result in an excessively chatty synchronization that takes longer.
- LDAPFieldNameToApiFieldNameMapping: This maps LDAP property values to standard field names expected by the API. For example, the standard API field ‘FirstName’ is mapped using the LDAP property ‘gn’, with a fallback value in the field ‘givenName’. This kind of mapping is required since not all LDAP server implementations store the same information under the same name. For example, Wasp Barcode uses ‘givenName’ and ‘sn’ but not ‘gn’ and ‘surName’.
- The order of “FALLBACK” is dependent on the order of appearance.
- LDAPPropertiesToLoad: By default, the known ‘standard’ as well as quasi-standard LDAP field names are requested from the LDAP server. The user is free to add additional fields, separated by commas.
- LDAPSortOptionPropertyName: By default, request that the LDAP server sort by SamAccountName when returning the records.
- LDAPFilterEmployeesOrStaffMembers: This is the basic template for querying employees/staff members. Each LDAP administrator is expected to know the exact values.
- LDAPFilterCustomersOrStudents: This is the basic template for querying students or customers of an educational institution. This will vary from business to business.
Command line parameters
- If the first command line parameter contains the string “customer” or “student” then students/customers will be extracted and synchronized using the public API.
- Likewise, if the first command line parameter contains the string “employee” or “staff” then employees/staffs will be extracted and synchronized using the public API.
- Likewise, if the first command line parameter contains the patterns from both sets, then the LDAP extraction tool will synchronize both students/customers and employees/staff.
New Features as of 2023.11.01
Feature 1 – New Command Line Argument
[New feature as of 2023.11.xx] [New feature as of 2023.11.01]
As of the 11th month (November) MMXXIII Anno Domini Nostrum, the following command line argument was added: “-assetFile”
Purpose: Given a command-separated-file (*.CSV) or a TAB delimited file (*.TAB), this will read the data file containing the Asset Serial Number, Computer/Machine Name, Machine CPU Processor Model, Last Login Time to that machine, # of memory installed on the machine (in Bytes), The Size of storage (Disk Size, in bytes), The Top User Account Name, Optional Asset Tag, Optional Asset Description, the Asset in the database will be matched by Asset Serial Number(column #1 of the Data file), and create/update the Dynamic Custom Field values for that asset serial number. If the asset serial # is not found, then the log file will reflect that error.
These are the default mappings in the .INI file:
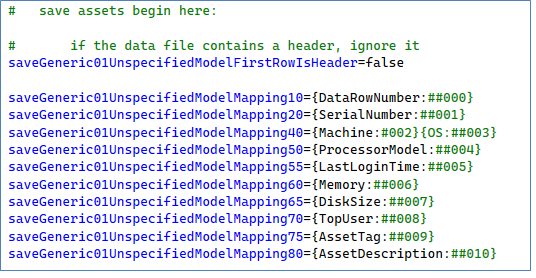
Note: The file is NOT expected to contain headers. The Ordinal Data Column number is used to map the data columns into their respective logical field names.
This section in the INI file defines the mapping of logical field names to the actual backend:

The data file can be a traditional “.CSV” file or tab-delimited file (“*.TAB”).
In theory, the LDAP filters could be used to extract network resources, such as workstations, computers, servers, printers, etc. However, many LDAP configuration has misconfigured data elements, such as (objectCategory=Person) instead of(objectCategory=computer).
This is an example of the CSV file which contains data to be synched with the database:

Examples of syntax:
- “Path\to\ActiveDirectoryLDSExtractionTool.exe” -assetFile “%ProgramData%\path\to\existing\AssetFile.csv”
- “.ActiveDirectoryLDSExtractionTool.exe -assetFile “%ProgramData%\AssetFile.exe”
Feature 2 - Flags
[New feature as of 2023.11.xx] [New feature as of 2023.11.01]
The Following are the newly added flags:
-studentFile:
-customerFile:
Purpose: This feature allows an external data file containing students (or customers) to be saved to the database. The data file MUST HAVE A HEADER ROW, with column headings “UID”, “Last Name” and “First Name”.
Here is the data file mapping for students/customers data file:
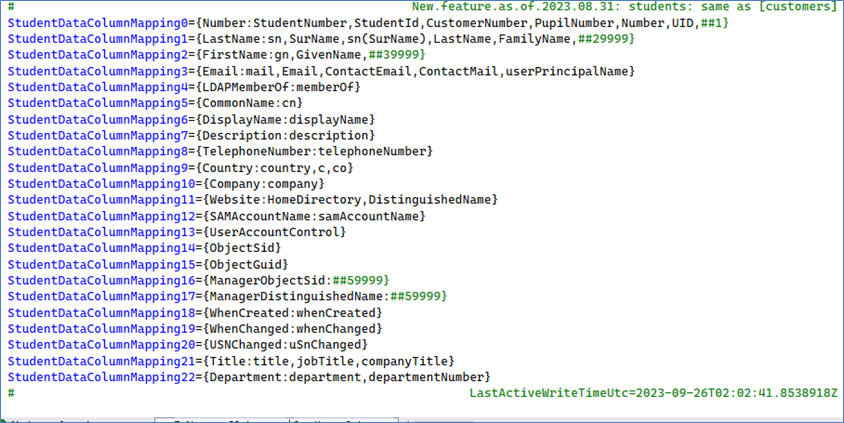
Note: In theory, the LDAP server can extract Machines/computers/servers/printers, Staff/Employees, and/or Students/Customers. However, the reality is that most LDAP (Domain) servers misuse the existing LDAP field names. For example, there were instances of a person being misclassified as “computer”, or vice versa.
The data file can be a traditional “.CSV” file or a tab-delimited file (“*.TAB”).
Examples of syntax:
1. “Path\to\ActiveDirectoryLDSExtractionTool.exe” -studentFile “%ProgramData%\path\to\existing\StudentDataFile.csv”
2. “.ActiveDirectoryLDSExtractionTool.exe -studentFile “%ProgramData%\students.tab”
Feature 3 - Flags
[New feature as of 2023.11.xx] [New feature as of 2023.11.01]
The Following are the newly added flags:
-employeeFile:
-staffFile:
-teacherFile:
Purpose: This feature allows an external data file containing Staff/Teachers (or employees to be saved to the database. The data file MUST HAVE A HEADER ROW, with column headings “UID”, “Last Name” and “First Name”.
Here is the data file mapping for staff/employees data file:
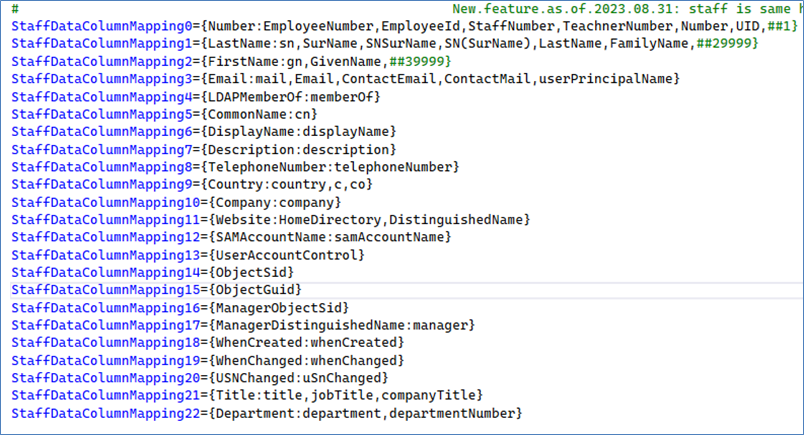
Note: In theory, the LDAP server can extract Machines/computers/servers/printers, Staff/Employees, and/or Students/Customers. However, the reality is that most LDAP (Domain) servers misuse the existing LDAP fieldnames. For example, there were instances of a person being misclassified as “computer”, or vice versa.
For both Customer(Student) and Employees(Staff/Teachers), the following data file example is provided:
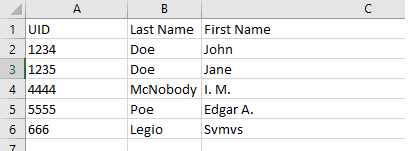
The data file can be a traditional “.CSV” file or a tab-delimited file (“*.TAB”).
Examples of syntax:
- “Path\to\ActiveDirectoryLDSExtractionTool.exe” -staffFile “%ProgramData%\path\to\existing\EmployeeDataFile.csv”
- “.ActiveDirectoryLDSExtractionTool.exe -EmployeeFile “%ProgramData%\Teachers.tab”
Feature 4 - Flags
[New feature as of 2023.11.xx] [New feature as of 2023.11.01]
The following flags were introduced in November MMXXIII Anno Domini Nostrum for the purpose of connecting the Domain Controller(s) [LDAP server] and creating a data file out of the LDAP data extracted:
-extractAdEmployeesToFile:
-extractAdStaffsToFile:
-extractAdTeachersToFile:
Purpose: These flags require an output (destination filename). The CSV file will be created, but the data will NOT be synched to the database. This will give the user the chance to modify the CSV file (using a Microsoft Office Application or an open-source Office product).
Examples of usage:
- “Path\to\ActiveDirectoryLDSExtractionTool.exe” -extractAdEmployeesToFile: "%ProgramData%\Teachers(Employee)Data.csv"
- “Path\to\ActiveDirectoryLDSExtractionTool.exe” -extractAdStaffsToFile: "d:\MyData\Blah\Blah\Staff(Employee)Data.csv"
- “Path\to\ActiveDirectoryLDSExtractionTool.exe” -extractAdTeachersToFile: "d:\MyData\Blah\Blah\caaditeeoslegiosumus.csv"
Feature 5 - Note About Security And Elevated Privileges
[New feature as of 2023.11.xx] [New feature as of 2023.11.01]
A note about security and elevated privileges:
If the application is installed into %programFiles% (usually C:\program files or d:\program files), then local administrator privileges are required to edit and save the *.INI file.
The new flags introduced in November 2023 do NOT write to the *.INI file. If administrator privileges are required, then a product such as NotePad++ could be used to edit the INI file. As an alternative, the user could run “CMD.EXE” as an administrator; and enter the command: “START NOTEPAD.EXE” and use notepad.exe to modify and save the INI file.
Feature 6 - Note on Microsoft Windows Task Scheduler
[New feature as of 2023.11.xx] [New feature as of 2023.11.01]
A note about the Microsoft Windows task scheduler:
The task scheduler can be searched for by entering “Task Scheduler” in the Windows search bar. Note the single space separating the words. The Windows Search Bar can be invoked by holding down the [Windows] key and pressing the letter-S. For instructions on how to use the Windows Task Scheduler, use Google search keywords: how to use Windows Task Scheduler.
Resources (LDAP QUERIES): Please refer to the documentation on websites like Google and YouTube.
What are the LDAP query fragments?
we want users, and things such as computers will not be included:
(objectCategory=user) (objectCategory=person)
We DO NOT want fictitious user logins: eg the default local admin for each Windows laptop:
(!(samAccountType=805306369))
We only want accounts where the bit flag 0x000002 is NOT SET (eg, active records that are NOT deactivated):
(!(useraccountcontrol:1.2.840.113556.1.4.803:=2))
LDAP queries DO NOT support the NOT EQUAL operator. So to say Field <> SomeValue, do this:
!(Field=SomeValue))
LDAP queries are joined using this syntax:
(some condition) or (some other condition) or (another condition), use the pipe:
(| ((some condition) (some other condition) (another condition) ))
Joining using logical AND should use & instead of the pipe.
LDAP ALSO supports bit and:
(!(useraccountcontrol:1.2.840.113556.1.4.803:=2))
Note: Please refer to ActiveDirectoryExtraction-ReadMe.rtf documentation in the zip file for extensive integration and automation information.
FAQs - Refer to Knowledgebase - Knowledgebase > Cloud for FAQs.
- Why cloud LDAP Extraction tool fails when attempting to contact https://localhost:44313/
Note: Use of the resources described here requires internet access.