Design Report FAQs
How do I add a pre-defined field to a report?
How do I add a custom field to a report?
How do i add parameters to a custom report & use it in scheduled report?
How do I add a total to a report?
How do I add a filter to a report?
How do I set up my label to print to an Avery Label sheet?
How do i add a variable in the label layout?
How to filter a report on a custom field
How do I add a pre-defined field to a report?
- Make sure there is room for the field by resizing or deleting existing report fields. When deleting or resizing, make sure you make change to both the field's Label and to the associated Data.
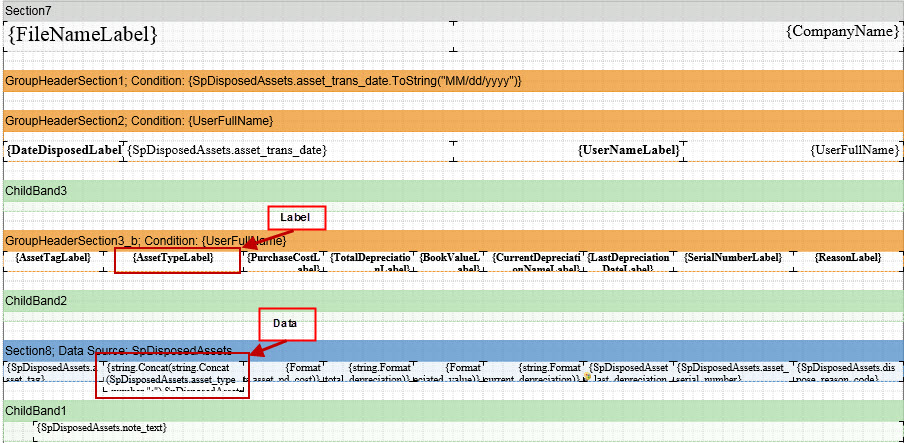
- To delete the field either right-click on the field and select delete or select the field and press the delete key.

- Drag and drop the new field in to the report in the space you created in step 1.
- First you will need to identify the data source associated with the report data.

- Select Dictionary at the bottom of the menu on the left sign of the screen, then find that data source in the Dictionary tab under Data Sources.
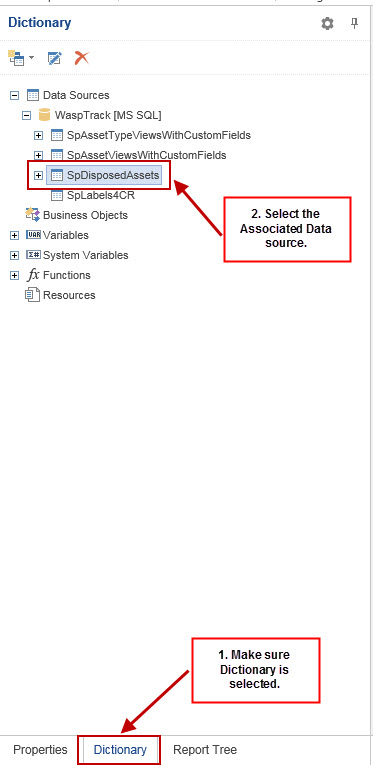
- Select the desired field from the data source and drag and drop in tothe report. Notice when you place the field you are given two different objects. The first contains the name of the field and the second contains the actual field data.
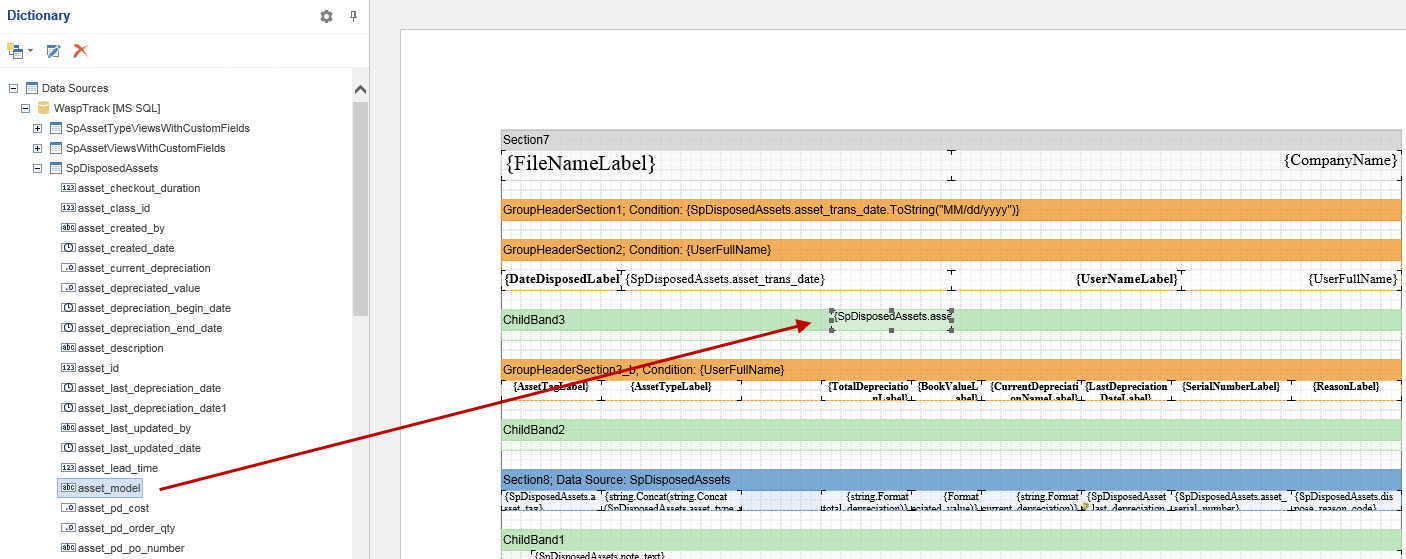
- Move the objects so that they are in line with the other objects and resize as necessary.

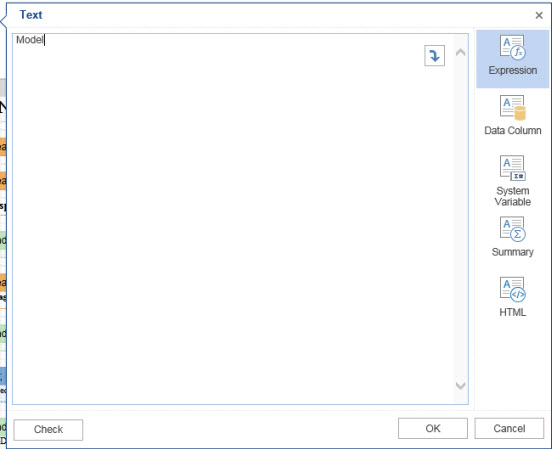
- Edit the label object to show the correct label value. Double click the label object to open the text editor. In the text editor make changes such as editing the text label, changing the font style and/or changing the font size (by selecting HTML from the menu on the right side of the Text edit screen. Select OK when you are finished making changes
- Once you have finished making cosmetic changes and lining up the new fields, select the Preview tab at the top of the screen to make sure everything is as expected.

How do I add a custom field to a report?
Many of the steps for adding a custom field to a report are the same as above, so I will just cover the differences here.
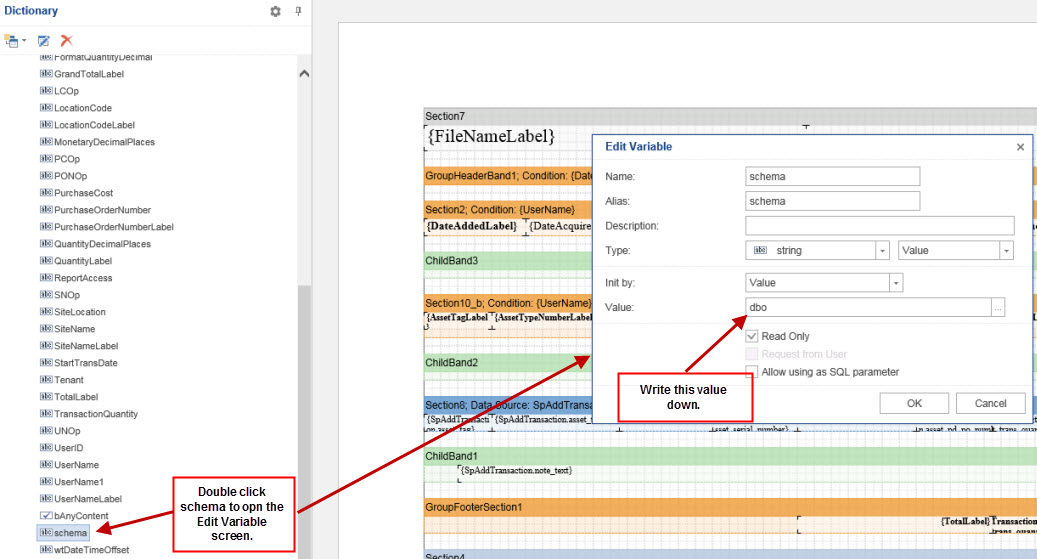
- First, you will need to jot down the schema for later use. The schema info is found under the Variable - Do Not Touch section. The schema value in the example below is dbo.
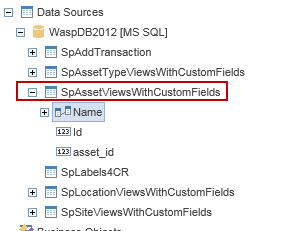
- Now find the data source associated with your custom field. If you created a Site custom field then you will look under the SpSiteViewsWithCustomFields data source. In this example, I created an Item custom field so I will be working with the SpItemViewsWithCustomFields.
- Next, you will need to execute the data source to make it retrieve the custom fields.
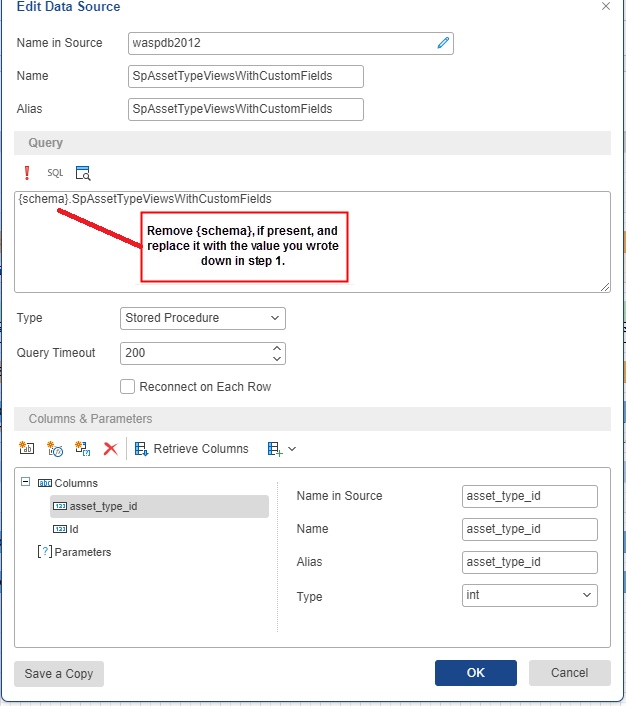
- To do this, start by right-clicking on the data source you identified in the previous step and select Edit. The Edit screen appears.
- In the Query Text field, you will see something like this: {schema}.SpAssetViewsWithCustomFields. In some instances, you may not see the {schema}. If that occurs, just make sure the end result is: valueFromAbove.SpAssetViewsWithCustomFields. In this example, my query text would be dbo.SpAssetViewsWithCustomFields.
- Now you are ready to execute the data source. First, click the dropdown on the right of Retrieve Columns, then check the “Allow Run StoredProc” check box, and lastly click “Retrieve Columns.”
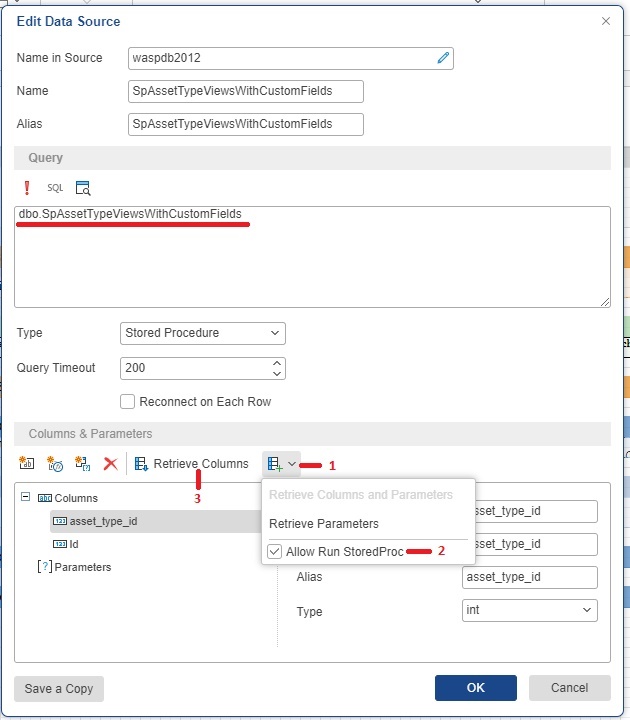
- You should now see a list of columns that include your custom fields. Press OK.
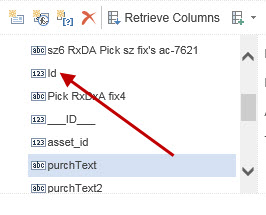
- Now you can drag and drop the field from the data source onto the report
How do I add parameters to a custom report & use it in the scheduled report?
Click on Reports > All Reports > Transaction Report > Transaction History Report > Design Report.
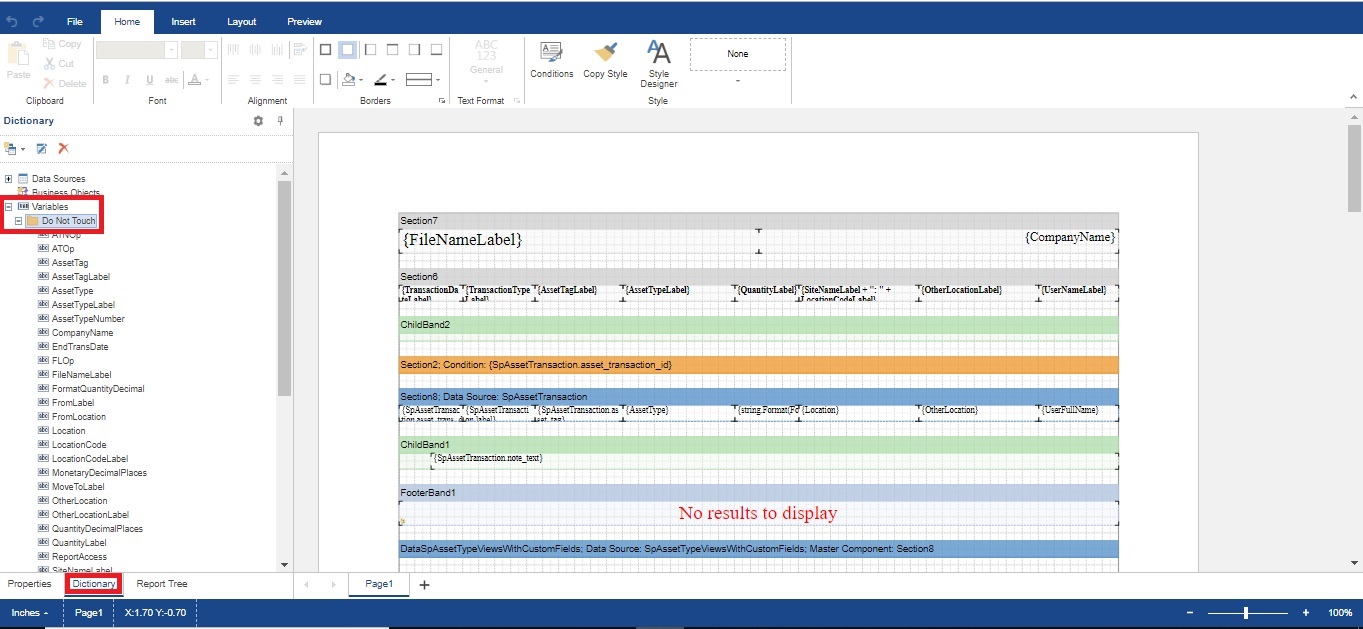
In the Design Report screen, click on the Dictionary > Variables > Donot Touch.
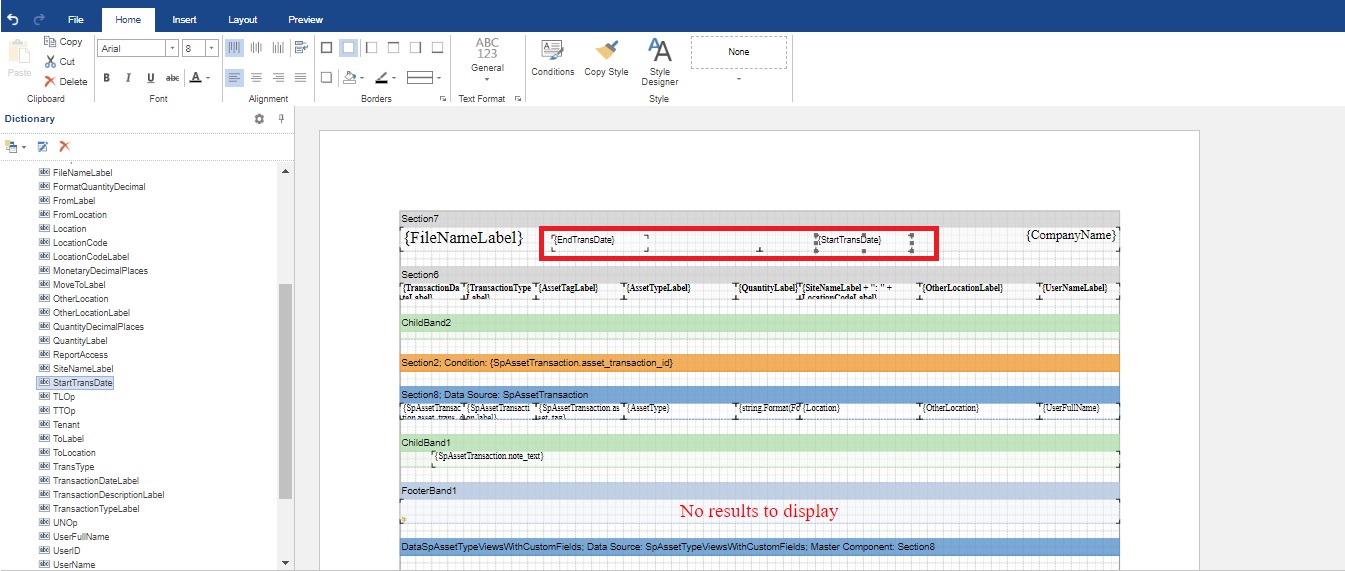
Drag the parameter that you want to add in the report. For example 'EndTransDate' and 'StartTransDate'
Select File > Save As > Update the report name.
Select the new custom report just created and select the report parameters and click on the Schedule button
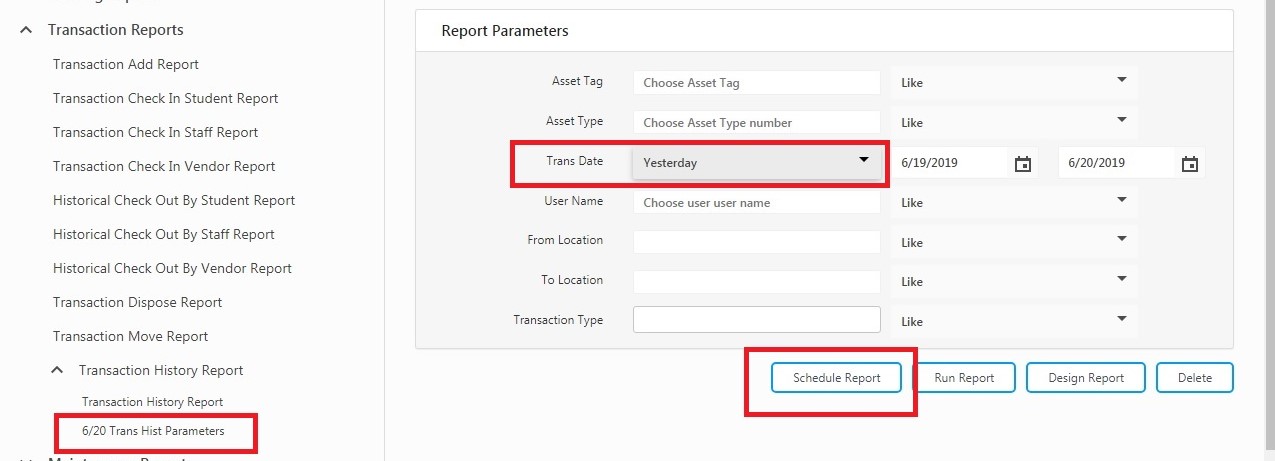
The Schedule Report screen will appear. Refer Schedule Report to fill out the Schedule.
The report will display the new parameters along with the scheduled timings and date.

How do I sort by a field?
- Find the Data Source band and double click on it or press Design on the Properties tab. The Data screen will appear.
double-click
- Next click on the Sort tab to view the sort menu
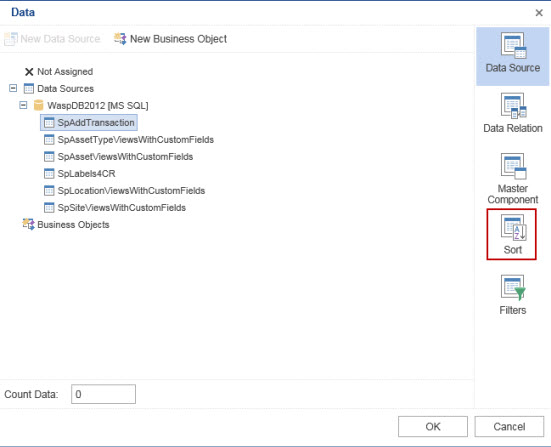
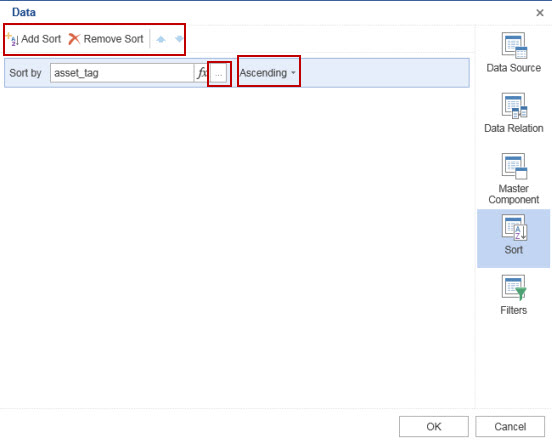
- If you want to add a sort criteria, click the “Add Sort” button. To change the existing sort criteria click on the “…” button and select a new field. Then choose ascending or descending. Lastly, press OK. Use Preview to see your changes.
How do I group by a field?
- First, you will need to identify how the report is currently grouping the data.
The easiest way to identify the bands that are grouping data is to look for the orange-colored bands that are before the blue data band. In the example below, you will see a Date Acquired group and a User Name Group. The Date Acquired group is grouping all the Items that were acquired on the same day together. The User Name group groups the add transactions by who performed them.
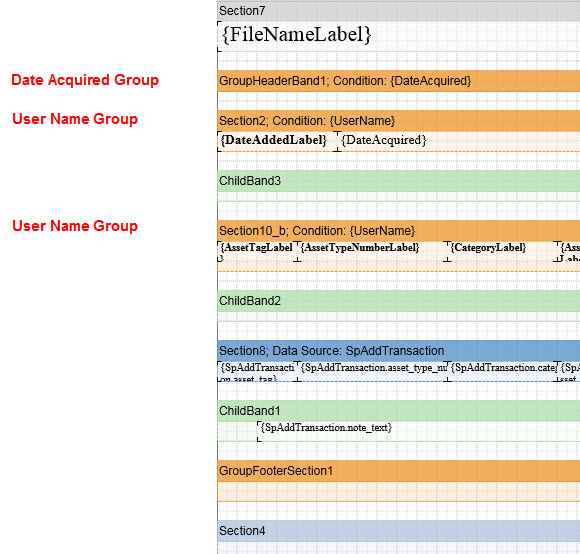
- Select the group band you want to change, double-click it or select Design from the properties tab.
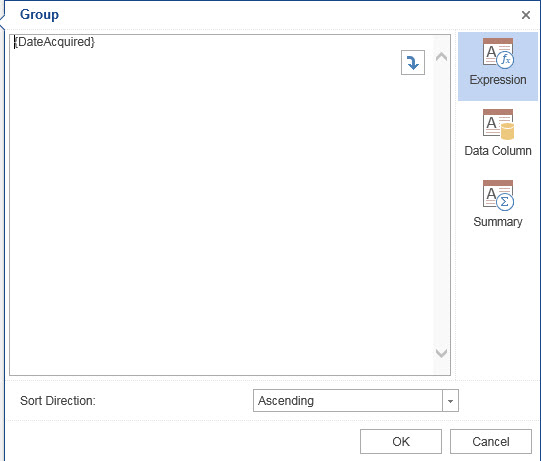
- To group by a field of data, click on Data Column, then select the field from the list. You can also select a sort direction. Select OK when done making selections.
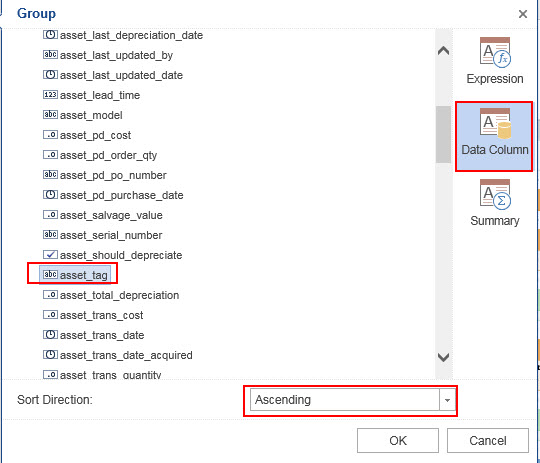
Keep in mind that modifying the grouping might affect the totals and other data on the report. Make sure you use a preview to verify the data appears as expected.
- If you want to add an additional group band to the report, click on INSERT and then drag and drop from the Group Header button. This will open the design window for the new band, which will allow you to select the data column. Once you press OK, you may need to adjust the location of the band by clicking and dragging.

How do I add a total to a report?
- Insert a text object onto the report
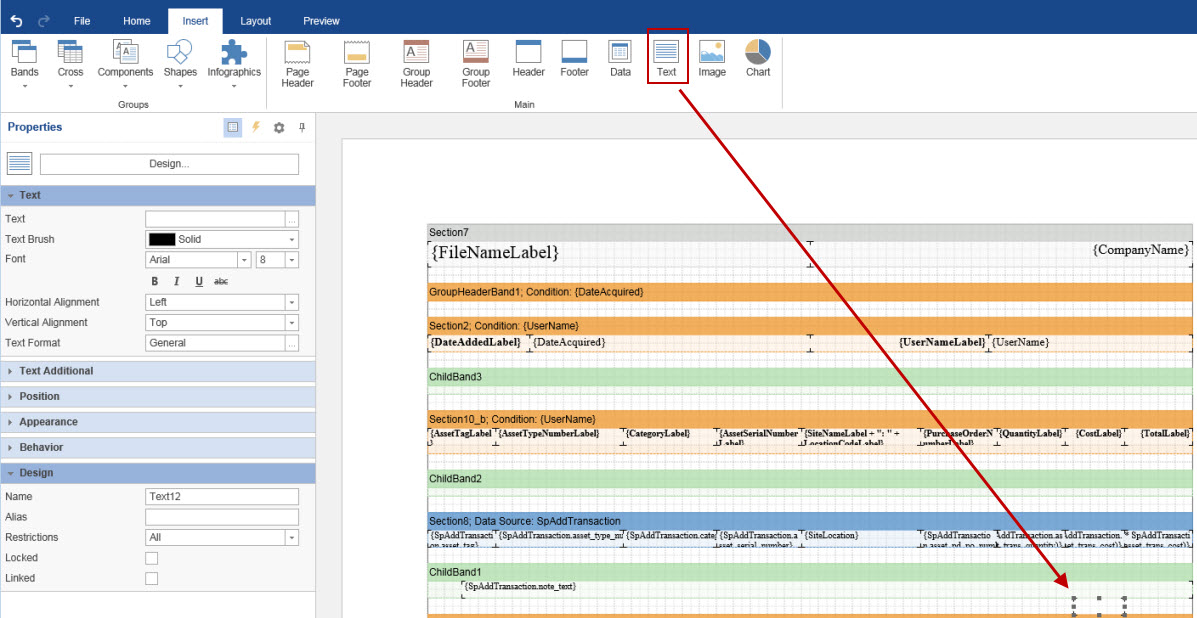
- The Design window will open automatically. If it does not double click the text object.
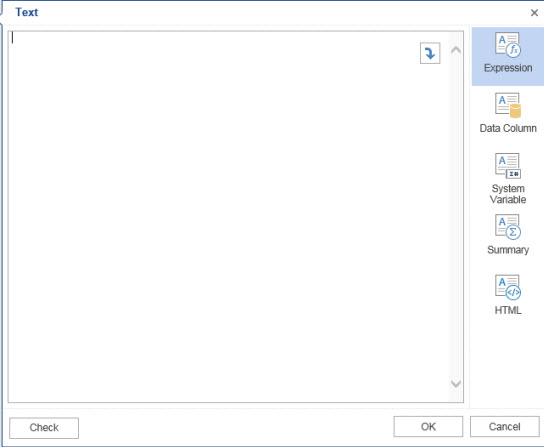
- In the Design window, click on the Summary tab
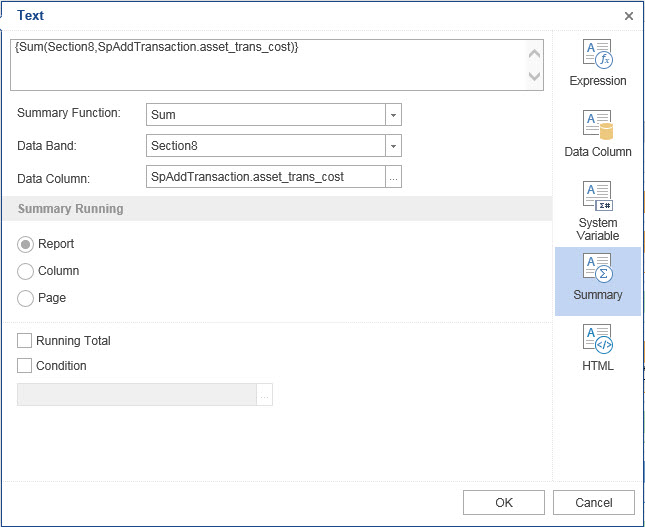
- First select the Summary Function (count, sum, average).
- Select the Data Band to sum for. If you want a grand total of the entire report, then leave it as Not Assigned. If you want a total based on the UserName group, then select that data band from the dropdown. If you do not see the band in the dropdown, then you may have to manually type it at the top.
- Select the Column to sum.
In the example below, selections have been made to sum the asset_trans_cost column for the GroupHeaderBand1. What this does in my report is sum the cost of the Item at transaction for the user group.
How do I add a filter to a report?
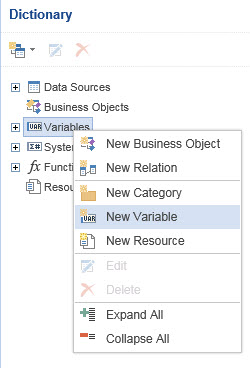
- Create a new variable. Right click Variables under the dictionary tab and select New Variable.
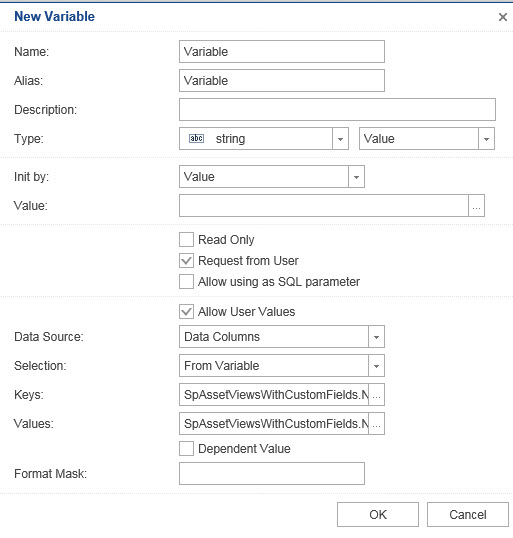
- Set Up the Variable to pull the data from the data source.
- Check the “Request from User” check box.
- Select Data Columns from the Data Source dropdown.
- In the Keys and Values dropdowns select the database column.
- Change the data source to use the filter variable created previously.
- Open the Designer for the data band.
- Go to the Filters tab.
- Click Add Filter.
- Select the data source column from the Column dropdown.
- In the empty text box next to “equal to” type in your variable name surrounded by curly brackets (i.e. {Model Filter}).
How do I set up my label to print to an Avery Label sheet?
Click the Properties Tab.
Expand the Page section and select the correct Paper Size, Orientation, and Margins.

Expand the Columns Section and select the correct number of columns, column width, and gap between columns.

Increase the height of the Data Source band if you need to change the row height of the label.

How do I add a variable in the label layout
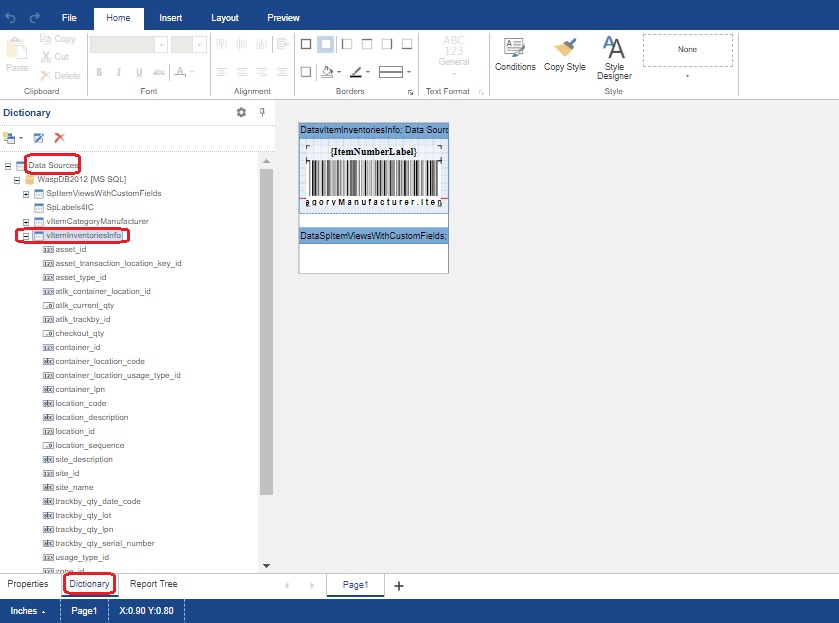
- Click on the Design Report > Dictionary > Data Sources > vIteminventoriesInfo.
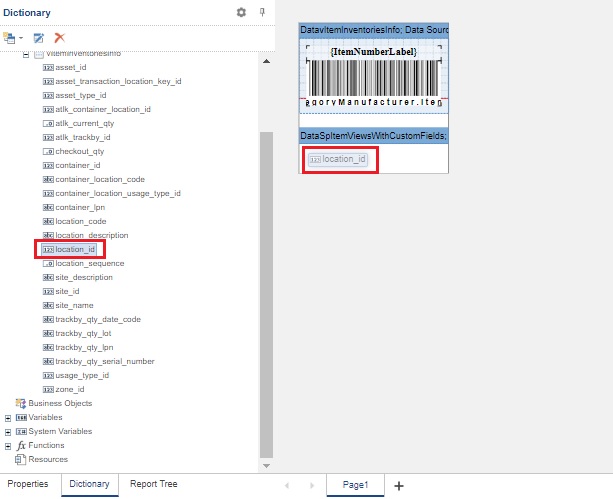
- Select the variable and drag on to the Label layout.
- Save the changes.
How to filter a Report on a Custom Field
- Open the Report Designer.
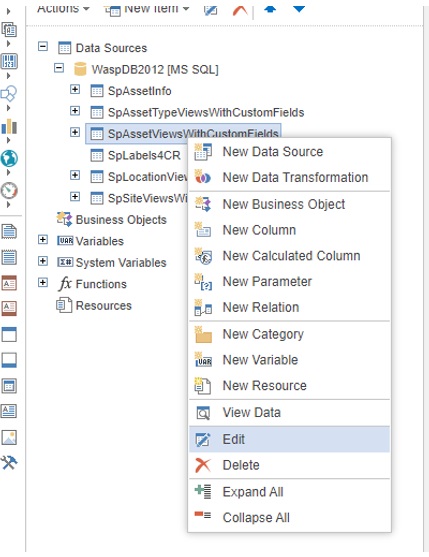
- Edit the stored procedure associated with the form the custom field is on.
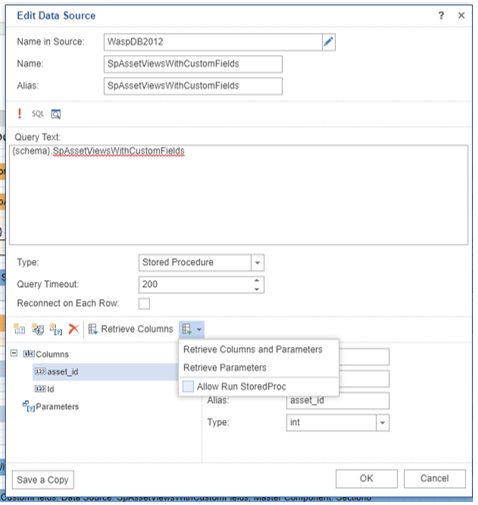
- Check the box for Allow Run StoredProc and then click Retrieve Columns. A popup may appear asking for your tenant name. It should be automatically filled in, but if it is not, please provide your tenant name. If successful, you should see your custom field labels listed in the Columns section.
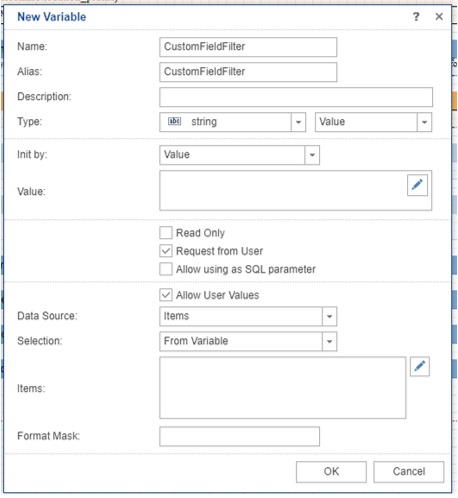
- Create a new variable to represent the user entered filter value.
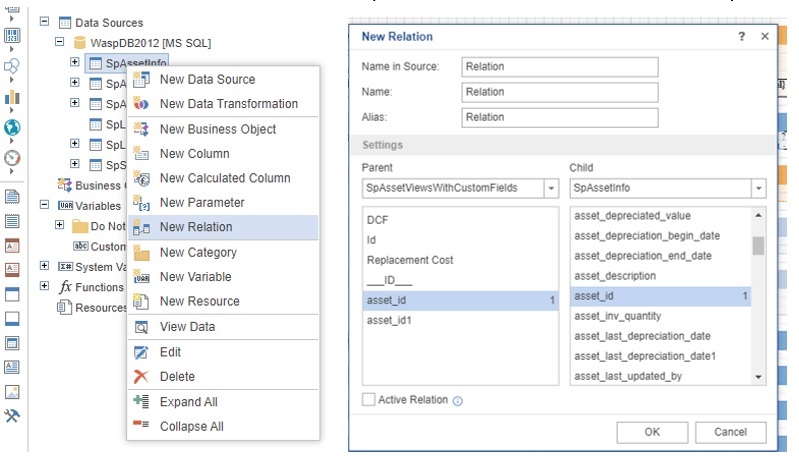
- Create a relation from the main stored procedure to the custom field stored procedure.
- Double-click the main databand and set the Data Relation.
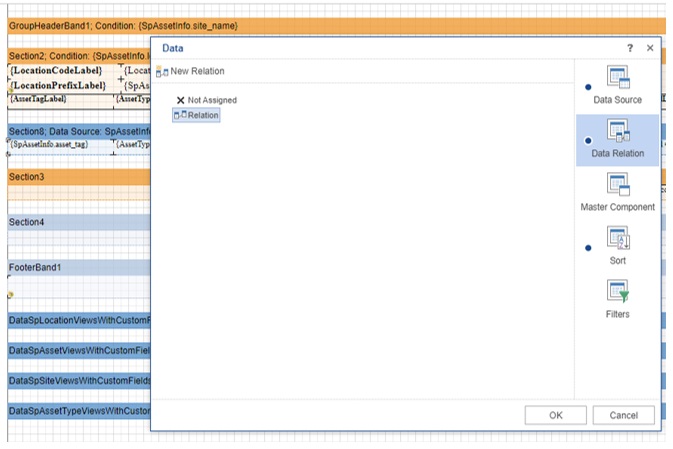
- Now go to the Filters tab in that same window to define the filter.
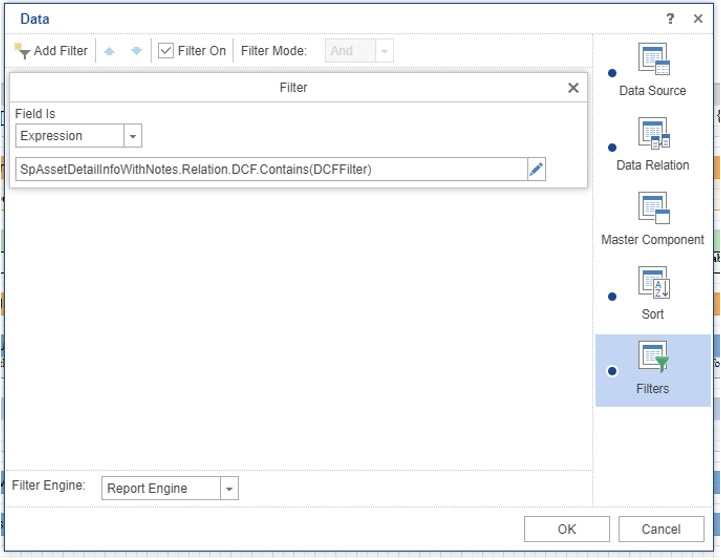
- If the report does not filter correctly, then you may need to delete the relation you created in step 5 and then create it again.