Adjust Inventory
The Adjust Inventory screen allows you to modify the quantity (inventory amount) of existing items. It uses the FIFO (First In First Out) method to adjust the total quantity to match the value you input here. It is especially useful when an inventory item is lost, found, or broken, or if you've inadvertently recorded an incorrect quantity. The Adjust Inventory features differ from the Audit functionality.
Note that this feature differs from audit functionality. Auditing ensures that certain actions like adding or removing inventory are unavailable during the counts whereas the adjust feature has all features enabled.
Please note that items tracked by serial numbers, which have been checked out, cannot be adjusted.
Note: Adjust Inventory is also available on iOS and Android devices.
Site-Item/Category Restrictions on the Adjust Transaction
Adjust Inventory
Select Transactions > Adjust.
![]()
The Adjust Inventory screen will appear.
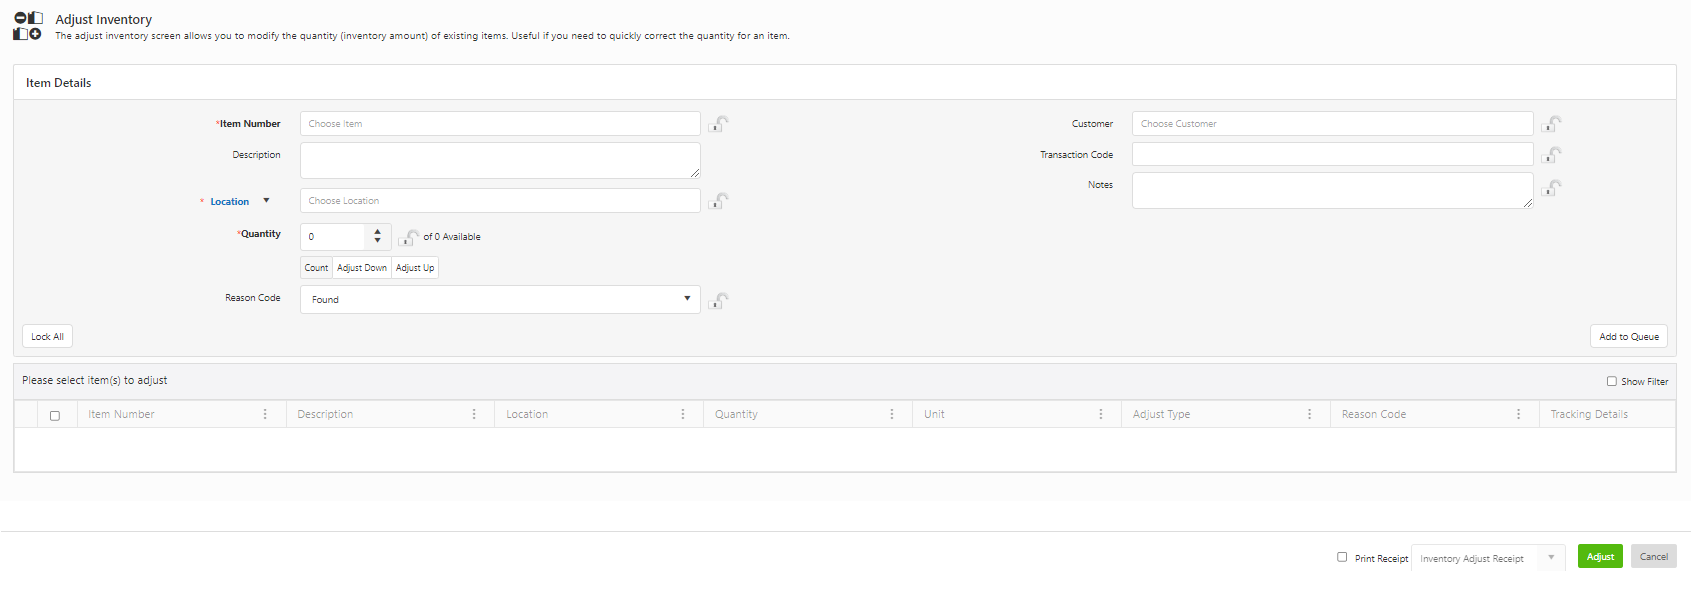
Item Details
Note: Several fields in this section can be "locked". When a field is locked, it will retain the information you entered through subsequent transactions. This is useful if you are adding multiple Items to a location or checking out multiple Items to a single customer. To lock an individual field, click on the lock icon. You can select the Lock All button to quickly lock all fields that have the icon. Select Unlock All to unlock the fields, allowing you to add new information. Click here for information on how to Lock fields.
- Enter the Item Number (required). The dropdown will display the Number, Description, and Type, where the Type may include item, container, container ID, serial number, etc.
- The Description field will automatically populate if the description is added while adding the inventory.
- Choose Location/Container from the dropdown and select the location/container of the item you want to adjust. Note: The container feature is scheduled for a future release.
- The location field will display the site and location name when hovered over with the mouse. Likewise, hovering over a selected container will show the site, location, container type, and container ID.
Location
![]()
Container
![]()
- The location/container field is an autocomplete dropdown for selecting either locations or containers. If "Container" is selected and no containers match the search (with a non-empty query), the dropdown automatically switches to search for locations. The same logic applies when "Location" is selected. The field name updates dynamically between "containers" and "locations" based on the search results.
- In the location dropdown, the site and location information are displayed. In the container dropdown, the site-location-container ID is shown.
![]()
- Enter the Quantity you want to adjust, then select one of the following:
- Count: This changes the count for the item. For example, if you want to change the count for an item from 25 to 36, enter 36 and make sure the "Count" is selected.
- Adjust Down: This adjusts the inventory quantity for the item down by the number entered. For example, if the current quantity is 25 and you enter 5 Adjust Down in the Quantity field, the InventoryCloud will change the quantity for the item to 20.
- Adjust Up: This adjusts the inventory quantity for the item up by the number entered. For example, if the current quantity is 25 and you enter 5 Adjust Up in the Quantity field, the InventoryCloud will change the quantity for the item to 30.
- Enter a Reason Code for the adjustment. Options are Found, Return, Breakage, Lost, and Cycle Count.
- Choose the Customer. Enter the Transaction Code and/or Notes for this transaction (Optional).
- When you are done entering information, click on the Add to Queue button. The added inventory will appear in the bottom grid.

Note that the location column will display the site and location name when hovered over with the mouse. Likewise, hovering over a selected container will show the site, location, container type, and container ID.
![]()
- To update the adjusted inventory details, click on the item in the bottom grid. The Item Details will get populated. Make the changes and click on the Update button.
![]()
- Print Receipt Checkbox - Click on the checkbox to print the receipt. If you want to change the receipt header name, enter the name in the text box next to the checkbox. Note: In case the pop-ups are blocked and you are unable to view the print receipt, refer to the topic Popups and Redirects to allow pop-ups and to view the print receipt.
- Click on the Adjust button. A message will appear indicating Inventory adjusted to Item(s) successfully. Note: Make sure all transactions that you want to process are selected in the list before clicking the Adjust button. Only selected transactions will be processed.

- The receipt will open in a new tab once you click on the Adjust button.
Receipt
![]()
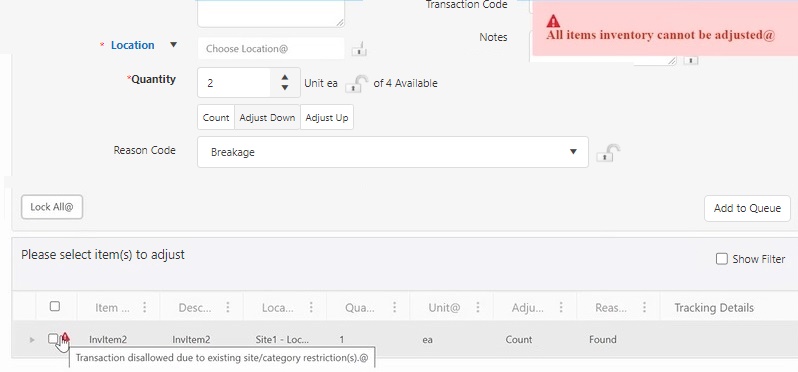
Site-Item/Category Restrictions on the Adjust Transaction
During the Adjust Count, the Site-Item/Category Restrictions are applicable if the quantity entered exceeds the current quantity in the system. The error message will appear, indicating that all inventory items cannot be adjusted. The item that cannot be adjusted will have a warning message indicating that "Transaction disallowed due to existing site/category restrictions.”
The Adjust Down (removal): No Site-Item/Category Restrictions are applied and in the Adjust Up (add), Site-Item/Category Restrictions are applied. Note: Adjust transaction allows the user to remove quantity for an item that is at a restricted site.
Also, refer to the topic Site-Item/Category Filtering on the Edit Site page and Working Site for more details.